Dūņu rūķītis
Dūņu rūķītis, jeb Knipucītiņumiņītiņimais pintiķipinītis
Homepage: https://appleairlines.wordpress.com
Proxmox: user mapping scripts
Posted in uncategorized on 20 March, 2023
Stumbled upon, as anglosaxons say, in redditt:
Sharing this storage between containers with mount points is super easy? No, sir. I don’t think so.
But they say there are scripts for using unprivileged containers and user mapping in Proxmox. These scripts will write the mapping, just copy to the container config file.
Fonts and Font Management in macOS
Excellent site about font management by Kurt Lang. Always dreamed about such a helpful resource.
Keep good work!
Push notifications in Firefox
Posted in www on 13 April, 2018
Let’s get rid of one annoying push notifications in Firefox.
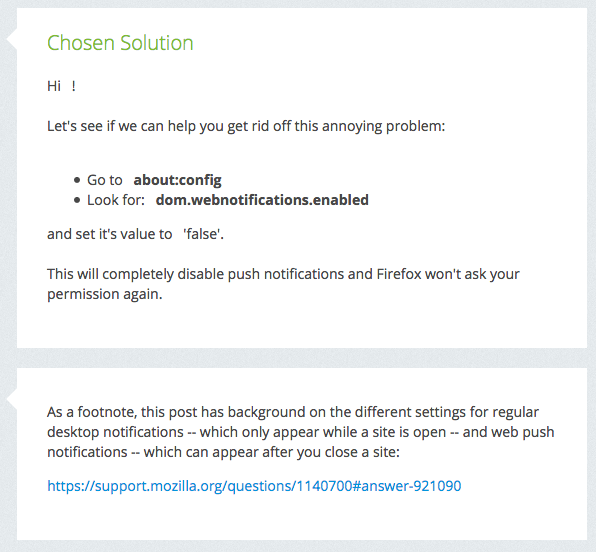
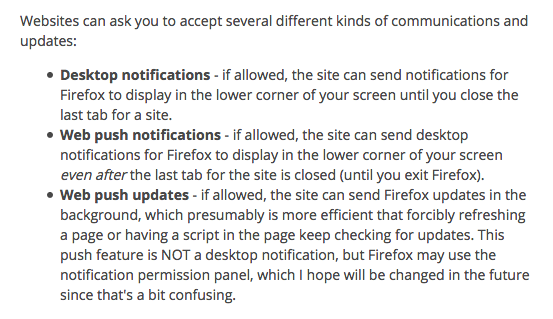
There are some smart words about terminology:
Note for adding an SSD to a 2012 Mac mini
Oh well. May be someday. SSD is good.
This particular instance affects you only if:
- You are upgrading a 2012 Mac mini.
- That 2012 Mac mini shipped with Mac OS X 10.8.2
- You are adding an SSD to this Mac mini as a second drive, alongside the existing Hard Drive using an OWC Data Doubler Kit.
If your installation involves all three factors, then you need to pay attention, as your installation will be affected. If one or more of these factors are not involved, then you don’t have to worry.
Info comes from here:
https://blog.macsales.com/15619-special-note-for-adding-an-ssd-to-a-2012-mac-mini
Firefox: setting prefs to stop altering copy
Try setting about:config and setting dom.event.clipboardevents.enabled to false. This works for sites which use methods to alter the text you copy to add crap (like famous classified advertisements website ss.lv)
Experimental 4G
Posted in uncategorized on 23 November, 2014
Here goes some screenshots from speed testing 4G Huawei modem in close vicinity to tower. Just for history.

Huawei modem test 1

Huawei modem test 2

Huawei modem test 3
How to Create an OS X Mavericks USB Installation Drive
Posted in uncategorized on 21 May, 2014
1. Download OS X Mavericks from the Mac App Store, if you haven’t already. If it tries to start the installation, just close it.
2. Insert your USB drive (you’ll need one that’s 8GB or larger) and open Disk Utility.
3. Select your drive in the sidebar and go to the Erase tab. Format the drive as “Mac OS Extended (Journaled)” and name the drive “Untitled.” (Note: if you already have a drive or partition named “Untitled” connected to your computer, name it something else and change the corresponding variable in step 5’s terminal command, or you might experience data loss!).
4. Click the Erase button and wait for Disk Utility to finish.
Your 8 GB USB drive should be called Untitled and formatted as Mac OS Extended (Journaled). The installer should be called Install OS X Mavericks.app and should be in your Applications folder.
5. Close Disk Utility and open up a Terminal window. Copy and paste this command* into the Terminal:
sudo /Applications/Install\ OS\ X\ Mavericks.app/Contents/Resources/createinstallmedia --volume /Volumes/Untitled --applicationpath /Applications/Install\ OS\ X\ Mavericks.app --nointeraction
Press Enter. The process should take about 20 minutes, so don’t cancel it or eject your USB drive while it’s doing its thing.
You should see something like this:
Erasing Disk: 0%... 10%... 20%... 100%...
Copying installer files to disk...
Copy complete.
Making disk bootable...
Copying boot files…
Copy complete.
Done.
6. When it’s done, you should get a message stating the process is finished. Now, you can restart your computer, hold the Option key to access the boot menu, and select your new USB drive. From there, you can launch disk utility, format your drive, and do a clean install of Mavericks.
You can then boot up from the USB by holding down the option key, then install the Mavericks from the USB.
Note that this will also install a recovery partition.
* From tywebb13 post on http://forums.macrumors.com/showpost.php?p=18081307&postcount=3
Direct Install of Windows 7 from Hard drive
Posted in windows on 11 April, 2014
How to Install Windows 7 directly from Hard drive
For example, you have a lapbook or desktop that you want to install Windows 7 onto, but can’t use DVD or USB for whatever reason (my usb stick does not starts, for example). This method will allow you to boot and install Windows directly from the hard drive. This guide involves accessing of hard drive from bootable Bart CD, Hiren’s Boot CD or other bootable solution (or putting into another working computer), preparing the hard drive, copyuing necessary files/folders, and installing Windows as usual.
Part 1: Preparing the HD with Windows 7 setup files.
– Connect the hard drive to another working computer.
– Format the hard drive to NTFS (Quick format works fine; multiple partitions also work).
– Copy the following from your Windows 7 disc:
Boot
Sources
Bootmgr
Part 2: Making the HD bootable
Using Windows XP, Vista, or 7, open CMD as Admin (Windows key + R, type CMD, hit Enter)
Enter the following commands, (replace X with what applies to your hard drive):
diskpart
 list disk
 select disk X
 list partition
 select partition X
 active
 exit
X:\boot\bootsect.exe /nt60 X:
Exit and shutdown.
Note: If you’re working on a 32-bit system, and you want to install 64-bit Windows, you may get problems trying to run the last command (X:\boot\bootsect.exe /nt60 X:).
Solutions: Use a computer with a 64-bit version of Windows
OR a little trick that worked for me: If you have a 32-bit Windows 7 disc, you can copy bootsect.exe from that and replace the 64-bit one (boot\bootsect.exe).
Part 3: Booting and installing Windows
Place the hard drive back into the target machine. Make sure that the BIOS is configured to boot from the hard drive. If you did everything correctly, you should see “Windows is loading files” and setup will load (really fast, too, because it’s loading from the hard drive). Install Windows as usual (but don’t format your drive this time in the installer – otherwise it will erase the Windows 7 setup files too!).
Part 4: Final steps/housecleaning
We’ll have to quickly edit the boot menu once Windows is installed.
In Windows 7, hit the Windows key + R. Type msconfig, and hit Enter.
Click to the Boot tab at the top.
Click ‘Windows Setup (\windows)’, and hit Delete.
Click OK.
Click ‘Exit without restart’.
And lastly, delete the ‘Sources’ folder from your hard drive root (this will free up 2-3gb).
Running MacBook Pro with the battery removed
Posted in uncategorized on 2 March, 2014
There’s one problem with running your MacBook with the battery removed. MacBooks and MacBook Pros automatically reduce the processor speed by about half when the battery is removed.
http://support.apple.com/kb/HT2332 (it looks like page is removed by stupid apple)
[excerpt] Apple essentially down-clocks the CPU to prevent the system from shutting down if it happens to demand greater power than the AC adapter alone can provide: “If the battery is removed from a MacBook or MacBook Pro, the computer will automatically reduce the processor speed. This prevents the computer from shutting down if it demands more power than the A/C adapter alone can provide.”
What does Apple have to say about this? The official statement from its support document is that “It is strongly recommended that you do not use your MacBook or MacBook Pro while the battery is removed.”
more:
http://www.tomshardware.com/news/apple-macbook-pro-battery-benchmarks,6643.html
FTP server in Lion
Each of these FTP/SFTP server tricks work in all new versions of OS X, be it Mavericks 10.9, Mountain Lion 10.8, or 10.7 Lion.
Start the FTP Server in OS X
This will start a generic FTP and FTPS server on the Mac, but not an SFTP server:
• Launch the Terminal (/Applications/Utilities) and enter the following command to start the FTP server:
sudo -s launchctl load -w /System/Library/LaunchDaemons/ftp.plist
• Confirm the FTP server works by typing:
ftp localhost
If you see the familiar FTP login:
$ ftp localhost
Trying ::1…
Connected to localhost.
220 ::1 FTP server (tnftpd 20100324+GSSAPI) ready.
Name (localhost:Paul):
You know the server is running. If you don’t see that, then the server either hasn’t finished starting yet or you didn’t enter the command properly. You can then ftp from other computers to your new server via the same ftp command, or by using the “Connect to Server” option in the Finder.
Disable FTP or SFTP Server in OS X
Here’s how to disable the FTP server:
sudo -s launchctl unload -w /System/Library/LaunchDaemons/ftp.plist
As the command suggests, this unloads the ftp daemon and shuts down the server. Obviously you can only shut down and disable the FTP server if it was enabled to begin with.
Disabling SFTP is just a matter of unchecking the “Remote Login” box that sits within the Sharing Preference Panel of OS X.
Note: The FTP and SFTP servers are different, and enabling one does not enable the other. SFTP is recommended because of the default encryption layer and secure transferring.

